Wednesday, 30 November 2016

The Great Knitaway 2017

Okay, here we go, I have finally decided on my big challenge for 2017.


There are lots and lots of things I want to make, things for my children, family and friends. There are also so many patterns I want to try out.

After being so very, very lucky to be gifted wooly items through the generosity in the Instagram knitting community and knitters pay it forward movement, I want to gift to those who need it most.

So in supporting my favourite charity Knit One, Give One, I am going to knit 10 items on my want to knit list, and gift these to KOGO by June 30 2017.

Some Rules;

* I can't knit and gift an item made from same pattern twice! 10 different items, 10 different patterns.
* I can't knit a pattern I've made previously, it all has to be patterns I'm making for the first time.
* I still have to make the other items on my list, knits for birthdays, weddings etc.
* All 10 Items have to be finished and delivered to Knit One Give One by June 30 2017.

My plan is to make beautiful, one of a kind items that will help lift the spirits of someone I have never, and will never meet.

If you've been following my blog for a while, you'll know that we once received the gift of a beautiful handmade quilt from an unknown quilter at the quilters guild. It was for our little girl when she was just a newborn, recovering from her first open-heart surgery in hospital. This really had an amazing effect on our mood and outlook. We will cherish the quilt forever, so I know firsthand what a difference something handmade with love can make.

Do you have any suggestions? Any patterns that have caught your eye? Please let me know!


Want to play too? I'd love for you to join me! Follow the rules above, gifting your items to any charity you desire. Play and follow along on Instagram using #knitaway2017

Thursday, 3 November 2016

Making - An Update

I have been making, and no, I haven't been blogging, not here anyway! I've had many distractions this last few months, one major one being the business my husband and I are setting up called Cocooned.


After caring for our daughter in hospital, having had two open heart surgeries and numerous other surgeries, it became apparent that dressing your child under these circumstances is extremely difficult, and so, we designed clothing that will help families in this situation.


We're still working on the design and should be moving into manufacture soon (fingers crossed).


So as well as making things, designing clothing and doing 'business stuff' I've also been over at the Cocooned blog, blogging about support for families who are caring for their child in hospital.


Boy have I been making though! What have I been making? Well, I have recently knit my first pair of socks!! Oh my gosh, that was terribly exciting, so exciting I've since made a second pair and am chomping at the bit to make a third!


My First Ever Pair of Socks! - Three Colour Socks

2nd Pair of Socks! - Purl Soho Pom Pom Socklets 
(sans pom poms!)
Yarn from We Love Knitting

I've made a stack of little cup cosies to support Tuberous Sclerosis Complex (TSC) research,  You may remember my post on Mel's Hats for Aleshia campaign. Well now Mel has a new campaign called Cup of Hope. Make sure you are following her on Instagram so you can get your hands on one of hers (or my) cup cosies. 


A fantastic stocking stuffer and a great cause to support. I've made my own pattern in 8ply (DK) yarn and when I get the opportunity, I will pop it up on the blog.

Stack of Cosies
Sweet!


Other makes... Baby blanket for an adorable new little man, an octopus, mittens for Lion and the Snail
, a tea cosy, as well as a little (mini) faux taxidermy triceratops and a giant doughnut (really should have photographed them side by side)!


Baby Blanket - My own Pattern


Octopus - Pattern from Purl Soho
My design is a smaller version. 8ply on smaller needles.


My own baby mitten designs!
You can find them at Lion and the Snail

Skipping Girl Tea Cosy
This was my own design from an existing pattern

Mini mini Faux taxidermy Triceratops!
Pattern by Sincerely Louise

Made with 10 ply (Aran) on 4mm needles

Pattern from Donna Wilson's Book;
 35 knitted animals and other creatures
(or doughnuts I guess!)

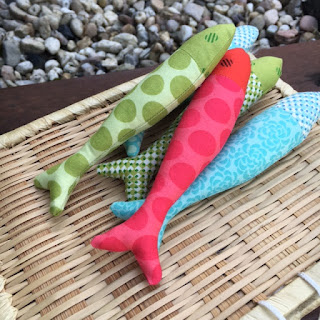
Yipes, it's all very knitty, isn't it?! I do have some sewing projects I really want to get to, Mum and I did make some sewn fish together (to become Christmas decorations) that was fun.


Catch of the day!! Pattern from the book Tilda's Toy Box

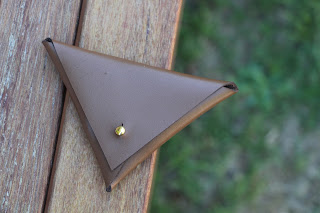
I also managed a Hammered Leatherworks Whisk Luggage Tag. Which I haven't whisked away for any major holidaying as yet...


I did made a monkey 4th birthday cake too.


Monkey Cake!
Plus, thanks to the CWA, I got myself a new crafty skill. Japanese braiding or Kumihimo. 

So easy and so addictive! My 5 year old loved it too

So as far as my 2016 'challenge', make 12 items in 12 months, by my count, I've already done it! Not much of a challenge though is it?! I think I need to up my game for 2017...


Seriously, a big handmade challenge for 2017, any ideas?

SaveSaveSaveSave
SaveSave

Sunday, 19 June 2016

Handmade Sustainable Gift Pack

Using eco friendly, reusable items and living a more sustainable, less packaged existence, has not only had an impact on our immediate family, but also extended family and friends. 


Reusable bread bags 

I've had a lot of people asking me how to make something, or where to get an item from, or how they can make it themselves.

Beeswax Wraps
Plastic Wrap Alternative
So I decided to come up with a Handmade Sustainable gift pack. A pack full of goodies that I have made to gift to people for housewarmings, birthdays, or whenever! 

All the items are easy to make, and are not only a great gift, they are also a great talking point. When you gift these items, it gives you the opportunity to not only explain how they work, but also make people more aware of the disposable way in which we currently live, and introduce a way of reducing their waste and living more sustainably (without freaking them out or lecturing them!).

I have made all of these items, and blogged about them previously, follow the links to find out more on how to make each one.


My pack includes; A cotton bread bag (made from a 100% cotton tea towel). Three felted dryer balls, and two reusable beeswax wraps.

A Handmade Sustainable Gift Pack
Your friends and the environment will thank you!

These are the items I included in a gift pack, however you include any number of things. Items that you might prefer to make, or already make. Items such as shampoo bars, a pot of flowers, or even herbs, in a handmade pouch (as pictured). Even a few good old handmade handkerchiefs! There are a myriad of possibilities.


What items would you include in a handmade sustainable gift pack?

Thursday, 12 May 2016

Pipsqueaks Blog Book Tour - Book Review and Mini Challenge


I am very excited to be a part of a world-wide blog tour for Sally Dixon's new book Pipsqueaks ~itsy-bitsy felt creations to stitch and love.

I am also excited to be able to have a digital copy of the book to give away! Details at the end of this post.

Sally lives in South Australia, and originally trained as an early childhood teacher. As well as having created this book full of tiny patterns, she also makes them to sell in her online Etsy and Madeit stores ~ Sally Dixon Creations.


Some of the adorable little things you can make

Sally set me a challenge to go along with my review (how can you review something without trying it yourself?!) The challenge was to make three items from her book, one from each chapter; Somewhat Pipsqueak, Perfectly Pipsqueak and Utterly Pipsqueak.


Challenge accomplished; Sew cute!!

I actually had fun making these three little fellas. You'll note I said 'actually', as I was concerned that my sewing skills would not be up to the task, however it turns out, they were! If I can make them, it bodes well for anyone to give it a go.


The ice-cream was my favourite!

For this review, I was provided with a digital review copy of the book Pipsqueaks, from C&T Publishing.


The Good

Sally's introduction provides a comprehensive list of all the techniques and items you'll need to make all 30 + of these tiny creations.

Each project is set out step by step with images as well as written instructions. This makes it very easy to follow and complete.

I think there is something for every skill level here, and I'm pretty sure my 10-year-old self would have adored this book during the school holidays!


Little Bunny (actually the bigger little bunny)


The Not So Good

I like a book I can physically get my hands on, especially when it comes to crafting. Getting around an e-book is still a bit New World for me! I did compromise and print out the pages for the ones I made.

(Sally has a hardcopy of the book too, if you prefer physical to digital)


In progress


Things That Would Have Helped Me

Perhaps some alternative suggestions for embellishments when you don't have beads or other bits like mini pom poms on hand. There are a few general ideas in the introduction, however a few gentle reminders or suggestions for each project would have been amazing.

A #hashtag for sharing images of completed creations. I'd love to see what other people have made and how they interpreted the patterns.


Loved working with felt


All Up

Quick to make and super cute! There are lots of things in this book to love. I also feel that it would make a great gift for a crafty youngster (don't forget to throw in some pieces of felt!)


Sally's Elephants, perhaps when I'm a little more
confident with my pipsqueaks!

You can go on tour along with the book too, check out the other blogs that are on the trail;

11th May 2016: C&T Publishing - (Concord, California, U.S.A.)

11th May 2016: We Bloom Here - Margaret Bloom (San Francisco Bay, California, U.S.A.)

12th May 2016: My Handmade Adventure - Karen Wasson (Melbourne, Australia) - You are here!

13th May 2016: 60 Degrees of Inspiration - Joanna Riley (Shetland Isles, Scotland, UK)

14th May 2016: Buttonsy - Anna Day (London, England, UK)

15th May 2016: Madeit - (Lennox Head, Australia)

16th May 2016 Sally Dixon Creations - Sally Dixon (Adelaide, Australia)


Now with thanks to Sally and C&T Publishing, you too can be lost in an itty bitty Pipsqueak world. All you have to do to be in the running to win a digital copy of Pipsqueaks, is leave a comment on this blog post.

Competition closes on Monday 23rd of May 2016 when a winner will be drawn at random.


a Rafflecopter giveaway

Wednesday, 4 May 2016

Hot Air Balloon Cake

Balloon! I loved this cake

This cake I made for Arthur's first birthday (2 and a half years ago) has been quite popular from my previous post. So I thought I'd give it a bit more attention by adding a little 'how to'. It is a very easy cake to make. 

Concentration!
You can make whatever flavoured cake you choose. For this one, I made one of my favourites, an apricot chocolate chip cake. Yum, it's a good one.

Some hot air balloon cakes use a square basket (cake), I found the round one to be just as simple and perhaps a little more appealing. 

To decorate the basket I used a simple chocolate buttercream icing then placed the raspberry milk chocolate coated bullets as shown to get the basket weave effect. You can use liquorice, again it all depends on the flavours you like. 

I dug a small hole out of the top of the cake and filled it with smarties and the candle. 

Under the paper straws, I placed bamboo skewers. I was able to dig these into the cake to keep them in place. 


At the top is a paper lantern. You can get these in every colour under the sun and I think it has a nicer effect (and is reusable and better for the environment) than a rubber balloon. Also, when you light the candle underneath, you're not going to have melty poppy balloon issues!


I think it's my most favourite kids cake that I've made to date. Quite possibly the easiest too.


Have you ever made an easy, yet effective kids cake?!


Saturday, 23 April 2016

Handmade Doctors Kit; Upgrade

It's taken me a little while to get around to blogging about this one. In fact I had the whole kit made and gifted in February... only 2 months, I guess that's not so bad!

You may (or may not) recall, for Felix's 4th birthday last year, I made him a toy stethoscope and doctors kit.

Original kit

One year later, the original stethoscope was well and truly on it's last legs, so I decided it was time for an upgrade.

One year later, much loved

I got together some felt, ribbon and a headband. Putting it together was fairly straightforward, if you'd like some more in depth instructions, I based my design on this tutorial.

A vast improvement, plus it doesn't fall off all the time

Sewing this time. No knitting in sight, and perhaps a better choice.

The cardboard box I originally put the kit in had seen better days too. Now on my sustainable path, I came up with a solution using things I had around the house.

A lunch bag we weren't using for lunch, and some felt, has made the perfect (sturdy) doctors bag. It's been able to take a beating so far, with no signs of wear, as opposed to the original cardboard box, which didn't really stand up to the rigours of a child doctor!


I am very happy with these results, and am hoping I won't need to be revisiting another doctor's kit on his 6th Birthday!

What have you repurposed into an awesome kids toy?

Friday, 8 April 2016

Mind your own beeswax; Sustainable food wrap

In my pursuit to reduce our waste. I came across an adorable eco-friendly glad wrap alternative; Bees Wax Wraps! 

I originally purchased a lovely Honeybee Wrap from the gorgeous store String and Salt in Warragul. Honeybee wraps have much more to them than the ones I attempted below. If you're not wanting to go to all the trouble, I highly recommend them, they come in various sizes and in a range of beautiful fabrics.


Honeybee Wrap - Pic courtesy of Honeybee Wraps


I have an abundance of beautiful cotton that I purchased many moons ago for my small business which tried (and mostly failed) at selling iron on letters. This was the perfect use for these. Before I started, I washed the fabric first and gave it a little iron too.


Cotton and Beeswax

The only problem was, where to find beeswax? I tried a couple of health food stores half heartedly, knowing I wouldn't have any luck. Then, we attended a local farmers market and I asked the honey man from Pure Peninsula Honey (honey man isn't his official title by the way) I bought a small soap like bar of it and was even more excited to get making.

Not cheese, grated beeswax!

I followed the tutorial by Karen B at The Art of Doing Stuff

I love her take on the whole sustainable bit... It's not going to be possible for 99.9% of people to go 100% green, however if we recognise that we can help reduce waste, it's going to help make a big difference. (she says it much more eloquently than that)

I put my oven on 70 Degrees Celsius (for those not in fahrenheit) and it took about 5 - 10 minutes for the wax to melt and soak in. I also popped into my local op shop and purchased some old trays and an old grater just for this purpose, this cost me a whole $2. Mainly as I think if I'm trying to reduce waste, throwing foil in the garbage might be a little counter productive.

They've turned out beautifully, although I did end up repeating the process as I wasn't liberal enough with the wax the first time. Next time around I may concoct a mixture from beeswax and coconut oil. Thus far, I've been using them to wrap cheese and cover bowls... I am also keen to make some for gifts.


My Wraps

Have you attempted to make beeswax wraps? Do you have a special recipe or formula?

Sunday, 20 March 2016

Hammered Leatherworks - DIY Kit Review

It's March and I've made something... This one was terribly easy but it still totally counts! 

I have been itching to get my hands on one of these DIY Hammered Leatherworks kits for a while now, and found one in my letterbox this month with thanks to the Maker's Mailer.

Hammered Leatherworks DIY Kit Review

Hammered Leatherworks is based in Western Australia and is run by husband and wife team Adam and Bec. They make DIY leather kits which range from the little pouch that I made, to pencil cases, to more intricate purses, wallets and even handbags.

Each kit has four different coloured leather options, and all their leather is sustainably sourced.

Without further ado, here is my unbiased, unpaid and unaffiliated review of the Hammered Leatherworks Leather Hipster Pouch Kit.


The Good

Sustainably and ethically sourced leather, a big tick from me for this.

Free how to videos, along with little tips on the Hammered Leatherworks website. While all the instructions are in the box, it's nice to watch a little video so you can be certain you get it right!

Everything you need is in the box (apart from scissors, but I think everyone has scissors right?)

The finished product is very sweet and durable. (and doesn't look dodgy, even though I'm no 'sewer')


Crafting in the great outdoors... with technology!


The Not So Good

I'm still very much on task with reducing my waste, and unfortunately, the contents of the box came in a plastic bag. It's not over packaged with bits you don't need, just the plastic, oh the plastic.

However I have found when ordering things online from small businesses, they are extremely obliging in packaging things without plastic if you ask, I'm sure Hammered Leatherworks would be just as obliging.


Check out that stitching


Things That Would Have Helped Me

I would have loved the ability or option to personalise it somehow.

I did have some issues trying to watch the videos back on my phone, so perhaps just a few pictures online with a basic 'how to' would've helped me. This would also help people who don't have the plug-in or have issues accessing online videos for one reason or another.


Hey Hip Pouch

All Up

I had fun making the hipster pouch, something a bit different for me. While my input was pretty minimal with this particular kit, I still feel pretty stoked with it. 

I would love to try another more intricate kit, and have heard through the grapevine that they are looking at making kits for mobile phone cases. I'll be first in line for one of those!

You can purchase a Hammered Leatherworks kit directly from their website, they also have a list of stockists, so you can pop on into a store near you and pick one up if you want to get started right away!


Do you have a favourite DIY kit?